Monday 2 March 2015

Matte Plum Lips

Welcome back to my blog beauties..

I posted this make up look on my Facebook / Instagram & Twitter  this week and it got ALOT of attention. People asking what product I had used on my lips, so I thought I would give you all a little breakdown of the products I had used :) (Because I'm nice like that haha)

I suppose I should show you some Images of the make up look I'm talking about...


No Filter Images
Taken on my DSLR
 Facebook Filter Taken on Iphone 5

I added a little filter as I liked the "tan" effect the filter gave me! (Seriously need to learn the basics of applying fake tan without looking like an Umpa Lumpa! haha)!

Products Used

Eyes
NYX Concealer shade Fair
MAC Cosmetics Eye shadow shade Bare My Soul
MAC Cosmetics Eye shadow shade Friendly
Rimmel Liquid Eye Liner - Black
HD Brow Powder shade Medium Brown
MUA Pencil Eye liner - White
MAC Cosmetics Studio Sculpt Mascara - Superblack

Base
Illamasqua Hydra Veil 
NYX Concealer shade Fair
NYX Concealer Tan 
Illamasqua Skin Base Foundation shade 6
Illamasqua Gleam -Aurora
Sleek Light Contour Kit
Illamasqua Blusher shade Hussy
Illamasqua Cream Pigment Hollow
Kryolan Translucent Powder

Lips
The one thing everyone wanted to know!
Drumroll....
Please....

MUA Luxe Collection Velvet Lips Shade Kooky!


Thanks for reading :)
Zoe
xo

Monday 16 February 2015

Deep Blue Smokes

Hello Beauties :)

On Sunday I had the pleasure of a day off! Shock horror! As I had a busy weekend I gave myself a day away from the work load of University work too (As a little Valentine treat to myself ).

A day off  + being home alone + a mountain of make up can only equal on thing.... Me having a good ol' make over. It's not very often I create a dramatic look on myself as I don't often get the time plus I don't tend to go anywhere special to show off my immaculate face. Sunday I took full advantage of "glamming" myself up a little bit for the sheer fun of it :)!

I wanted to create a look using my new Illamasqua Reflection Palette (another bargain i got in their sales) aaaand so I did :)!


Here it is.....A deep blue smokey eye with extra glitter :)


 Eyes
HD Brow Pro Palette 
Illamasqua Reflection Palette Shade Graphica
Illamasqua Pure Pigment Shade Android
Illamasqua Sealing Gel
Illamasqua Powder Eye shadow Shade Obsidian
Illamasqua Eye Shadow Shade Sex
MAC Cosmetics Sculpt Mascara

Base
Illamasqua Matte Hydra Veil 
MAC Concealer Shade NC20
NYX Concealer Shade Tan
Illamasqua Skin Base Shade 06
Illamasqua Cream Pigment in Hollow
Illamasqua Gleam in Mirage 
Sleek Contour in Shade Light
Illamasqua Powder Blusher Shade Hussy

Lips
Lush Lip Exfoliater in Mint
NYX Lip Pencil Shade Mauve 
MAC Cosmetics Gloss Shade Flair for Finery


Thanks for reading 
Zoe 
x


Tuesday 10 February 2015

Snow White Theme Shoot - Behind the Scenes.

On Friday I had a photoshoot with Photographer George Burgess and Model Sophie McDowell. Myself and George had been discussing this shoot for a couple of months but neither of us had the time to actually shoot it. The main inspiration for this shoot came from Snow White, however me and George both wanted to put our own spin on it - Keeping it original!


Products Used
Eyes
Avon eye shadow Primer
Illamasqua Liquid Metal in Focus
MAC Eyeshadow Amber Lights
Illasmasqua Eye pencil in Vow
Bare Minerals Mascara Lash Domination
HD Brows in Medium Brown
Base
MAC Pro Concealer in NC15
NYX Concealer in Tan
Illamasqua Skin Base Foundation
Illamasqua Gleam highlighter in Aurora
MAC Blusher in Well Dressed to Shop
Lips
NYX Lip pencil in Cabaret
NYX Lip pencil in Auburn
MAC Lip Stick in  Russian Red

A few sneaky behind scene images I took on my Iphone...


Take a look at Georges Facebook page here: www.facebook.com/PhotographyGeorgeBurgess?fref=ts

Once I have received the final images I will share them all with you :)

Zoe 
x


Monday 9 February 2015

Illamasqua Multi Facet Palette

As the sales hit the UK high streets I was determined not to spend a thing, after just getting back from Thailand after 4 weeks of travelling my bank balance had seen brighter days to say the least. THEN......Illamasqua had an EPIC sale with products up to 70% off - this was designed to make me fail!

I noticed a couple of Palettes in the 70% off section that I knew if i didn't purchase them they would haunt me in my nightmares for the forthcoming weeks. One of them was the beautifully designed Multi-Facet Palette in Semblance. The palettes original price was £45 it was reduced down to £22.50 then a week later to just a mere £13.50 (Like I said It just couldn't be left behind). This little beauty arrived on my door step - It was a good day :)!

First thing first: Illamasqua Packaging NEVER fails to make me smile. It is sleek, strong and shiny making it easy to clean - for those make up covered fingers :) The palettes contents didn't disappoint neither it was certainly a bargain...


This palette is made for those that like to travel light (would of been perfect for my Thailand adventure), it contains 8 products as well as a double ended angled and blending brush. The Gleam Highlighter in Aurora adds a healthy glow to your cheekbones, the cream pigment in Hallow designed to contour your cheekbones, adding the blush in tremble to give you a POP of pink to your apples. The Eyebrow Cake in Thunder is an Illamasqua favorite, and the four powder eye shadows allows you to create a variety of looks.

Overall this product for me gets a big thumbs up! I wish I had bought two as I know when it runs out it is going to be a sad day haha! This product is limited edition although it isn't £13.50 you can still pick this gorgeous palette up for a good price of £22.50 at Illasmasqua Online

Zoe x


Thursday 5 February 2015

Portfolio Project - Week 1

This week we have been given our assignment briefs for our new modules. The past week I have been through every emotion possible (How is that possible? You tell me! haha.). I started off really excited about this module and my creative side was running away with me literally! I decided I would create a big elaborate Multi-Piece make up. I told my lecturer my idea, It then came apparent just how ambitious  I was being! As this project is designed so we have a awesome piece of work to add to our portfolio which would hopefully get us a job in the industry/area we want to. Being a novice in Multi-piece make ups, this is not the best module to do it in. I  felt deflated, hated the module and wanted to hibernate under a rock FOREVER! The only issue is, I actually want to pass the course - So last Thursday I sucked it up and started to plan again.

FINALLY it all came together I know exactly what I want to create, how I'm going to do it as well as how I'm going to display it :)! I am currently sketching/Photoshop-ing my pre-vis so I can show you all (and my lecturers) exactly what I want to produce. 

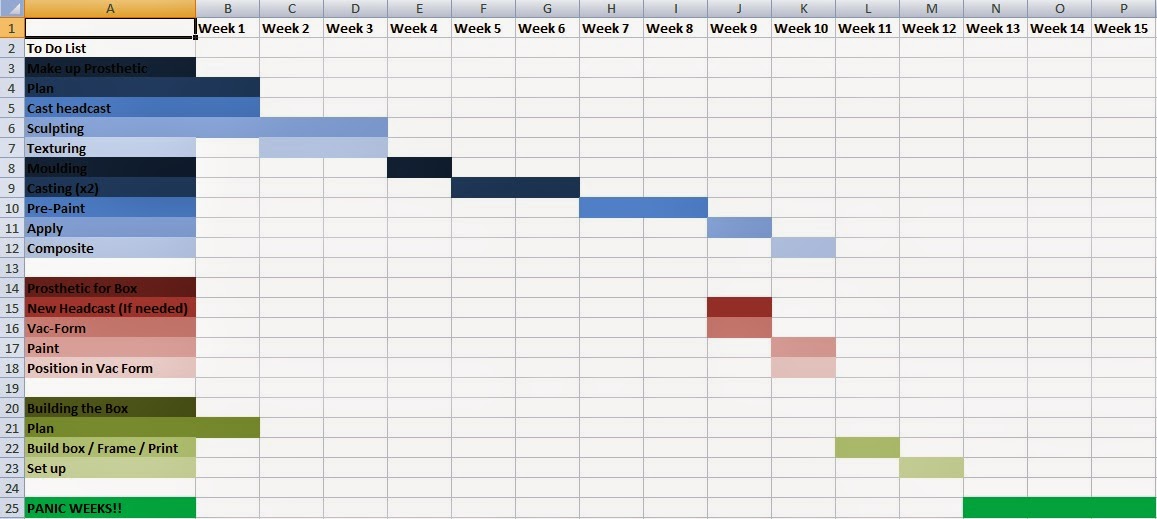
I have made a Gant Chart to keep on track and not fall off the wagon.


A budget has also been produced to make sure I don't bankrupt myself during it too (I'm getting pretty close to the line)

The display is something I'm excited but nervous about too! I want to display my prosthetic in an acrylic display box which has doors on the front that open outwards the only issue is buying something like this costs around £50-90 that's not an option I have. The only other choice I have is to build it myself, It will be a great learning opportunity however, this is going to be a nightmare! Inside the box will be the prosthetic positioned between 2 pieces of clear plasti-card that has been vac formed to match the face cast and prosthetic. 

I had a go at Vac forming yesterday so It was one less thing to worry about later down the line....

Here is the Vac-Formed face cast :)
 Once cut out....

I LOVE IT! I think it's an awesome little machine and suddenly want to vac form everything haha!


That is as much as I can update you all for now on this project but keep your eyes peeled as it's about to get very busy :)
Thanks for reading 

Zoe x


Friday 30 January 2015

Inside my travel make up bag...

Before I went off on my travels exploring Thailand, I had the usual "What make up should i take?" dilemma which the majority of us girls get! I tried to slim down my contents of my existing make up bag but I didn't seem to be getting anywhere. Each time I took something out of the bag, I added something else to make up for what i took out. It was just organised chaos - BIG FAT MESS!

I tend to leave the make up in the bathroom in the day and let my skin feel the fresh beach air and "glam" it up a little at night. As i don't tend to tan much taking one shade of a light coverage foundation doesn't prove troublesome.

My usual make up travel bags contains:


My usual option is the good old MAC Face & Body. I love this foundation as it gives me the option of a light coverage or I can build it up to a medium coverage. (For the "I look a mess today" days)

Bobbi Brown Pot Rouge for Lips & Cheeks in shade Rose. I absolutely adore this product as it's a 2 in 1 product and it can be subtle or built up just like the foundation!

Illamasqua Complement Palette, a small compact eye shadow palette which allows me to create a whole range of looks.
A good old Super Cheap Rimmel Soft Black Khol Pencil, as sometimes we all need a little drama on a night out!


Last but by no means least the good old faithful Bare Minerals Lash Domination Mascara.


Having NEVER traveled an entire country in 4 weeks my main concern was the weight of my backpack! I knew I would be picking up clothes/ ornaments / gifts along the way and wanted to make sure I kept my belongings as light as possible! SO.... the above options of make up I wanted to simplify even more! First off, I booked in with my local mobile beautician for Eyelash Perming and tinting and eyebrow waxing and tinting to give the base and save a little extra room :)

I started to do some research into products ideal for holidays on the web, Facebook groups and asking friends that have previously traveled. This is where I was sent in the direction of multiple BB creams, I have tried a variety of BB creams in the past and wasn't all that keen on them!

 I researched a little more and these are the products I ended up taking on my travels....


The Body Shop All-in-one BB cream, this product is incredible (Yeah I said it!) Its a lightweight coverage (so not ideal if your prone to breakouts) However, as it transforms from a white cream to suit your skin tone for the entire 4 weeks I didn't need to worry about the colour. It matched PERFECT every single time!! 
5 out of 5 from me. 


My trusty Bobbi Brown Pot Rouge for Lips & Cheeks in shade Rose. (Previously mentioned) I just couldn't leave this beauty behind. 
 Last but not least... MAC Studio Sculpt Mascara. I only used this towards the end of my holiday as I had my eyelashes tinted and permed before we set off.  Fist time I had used this mascara and I loved the length and depth this mascara gave me!


Yes that's it! ONLY  3 products, I think its unheard of - A Make Up Artist travelling with only 3 make up products! To be honest I couldn't of been  happier I did it, It made me forget about make up for 4 weeks and just enjoy my time travelling an amazing and beautiful country! These are certainly products I will be re-using on my next adventure. 

Be interesting to hear whats inside you're travel make up bag... :)


Thanks for reading
Zoe 
x


*Please note all images were taken from the brands webpage and they are not my own*


Wednesday 28 January 2015

Matrix Mould Making AKA Jacket Mould.

The past week I have been learning the process and steps of a Matrix Mould. I'm not going to sit here typing and pretend it's been an easy week. (I'm no liar!) The process is complicated and I struggled to get my head around it at first. It's a backwards process to everything I have learnt a year and a half into my SFX degree. BUT... it does eventually click I PROMISE! 

I'm not going to begin to start to explain the process as there are many websites / tutorials out there on the big wide web that would do a MUCH better job at it than me. I am merely going to explaining my experience with creating a matrix mould.

When our third year Mentor "Claire Minehane" told us what she would be teaching I went off and tried to do a little research into it. My first port of call for research is always my bible:

"Special effects make up for stage and screen "Second Edition" By Todd  Debreceni" If you haven't already purchased it and are interested in SFX! Get out and buy it..http://www.amazon.co.uk/Special-Makeup-Effects-Stage-Screen/dp/024081696X/ref=sr_1_1?s=books&ie=UTF8&qid=1422469419&sr=1-1


If I am completely honest the book gave me a little insight to what we would be doing however, I was still confused after reading. The main point I took from the book was the benefits of a Matrix Mould.

Here are a few:


  • Most accurate moulds. 
  • Alot of work goes into making them.
  • The rigid outer shell is created first. 
  • The softer more fluid material between the shell.
  • The process is best used to complex shapes. 

With these pointers in mind, I'll show you our process of a matrix mould of a plaster arm cast. 
Here is the first side of the mould. We covered the plaster arm cast with WED clay and added 3 pour holes, and many keys to ensure we had the precision we needed. 
Leaving the plaster arm cast in place, we cleaned up the outer plaster shell and prepped it ready for the next side to be moulded.
 Here is the mould with the other side prepped ready to be poured. We had a slight dilemma at this point we didnt make the clay walls strong enough which caused the plaster to start leaking a little. BUT...with a bit of patience and arm strength we gained back control :)!
 A lesson learnt and one to remember for sure! :)

Being so focused on the next steps I never took any photographs (Silly me!) At this point we filled the outer casts with PS28 Silicone to create the soft center which would collect all the detail :).

We then filled the center of the mould with Flesh tone Pigmented Pro Gel 10, we brushed the silicone into the mould to ensure all areas were covered. (As it's too heavy and big to slush). Once the Silicone was setting we poured in a Brown Pigmented Soft foam. The pigments were used to get a base colour to save time and products when painted.


The arm prosthetic isn't quite complete yet. It still has to be painted, which is my job to do on Friday. So keep posted to see the end result = A severed arm found in the rubble!

Thanks for reading
Zoe x